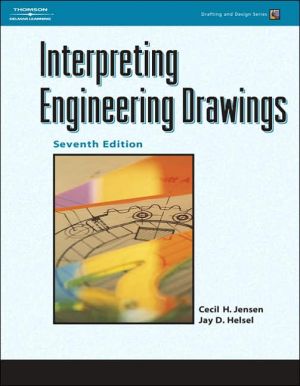
Interpreting Engineering Drawings
Comprehensive, state-of-the-art training is the cornerstone of this popular guide that shows users how to create professional-quality engineering drawings that can be interpreted with precision in today's technology-based industries. Clearly the most flexible, user-friendly book of its kind on the market, the seventh edition offers unsurpassed coverage of the theory and practical applications individuals need to communicate technical concepts in an international marketplace. All material is...
Search in google:
Comprehensive, state-of-the-art training is the cornerstone of this popular guide that shows users how to create professional-quality engineering drawings that can be interpreted with precision in today's technology-based industries. Clearly the most flexible, user-friendly book of its kind on the market, the seventh edition offers unsurpassed coverage of the theory and practical applications individuals need to communicate technical concepts in an international marketplace. All material is developed around the latest ASME drawing standards, helping readers keep pace with the dynamic changes in the field of engineering graphics. Booknews This text prepares students for careers in industry. It is designed to contain more information than normally required for a traditional program, so that instructors can select units for courses for a particular industry. Early chapters cover information essential to all courses. Later chapters offer specialized lessons in interpreting engineering drawings. Includes two-color illustrations, assignments and worksheets, plus 26 tables of machining data. Standard and metric units are used. This sixth edition features expanded units on drawings for numerical control and on manufacturing materials. Jensen has 27 years of teaching experience in mechanical drafting. Annotation c. Book News, Inc., Portland, OR (booknews.com)
Unit 1 Bases for Interpreting Engineering Drawings Engineering Drawings Line Styles and Lettering Sketching Information Shown on Assignment Drawings Unit 2 Lines Used to Describe the Shape of a Part Title Blocks and Title Strips Drawing to Scale Unit 3 Circular Features Center Lines Sketching Circles and Arcs Unit 4 Working Drawings Arrangement of Views Third-Angle Projection Sketching Views in Third-Angle Projection Unit 5 Dimensioning Dimensioning Straight-Line Features Unit 6 Inclined Surfaces Measurement of Angles Symmetrical Outlines Machine Slots Unit 7 Pictorial Sketching Isometric Sketching Oblique Sketching Unit 8 Machining Symbols Not-To-Scale Dimensions Drawing Revisions Break Lines Unit 9 Sectional Views Types of Sections Countersinks, Counterbores, and Spotfaces Intersection of Unfinished Surfaces Unit 10 Chamfers Undercuts Tapers Knurls Unit 11 One- and Two-View Drawings Multiple-Detail Drawings Functional Drafting Unit 12 Surface Texture Surface Texture Symbol Surface Texture Ratings Control Requirements Unit 13 Tolerances and Allowances Definitions Tolerancing Methods Unit 14 Inch Fits Description of Fits Standard Inch Fits Unit 15 Metric Fits Unit 16 Threaded Fasteners Threaded Assemblies Threaded Holes Inch Threads Right- and Left-Handed Threads Metric Threads Unit 17 Revolved and Removed Sections Unit 18 Keys Set Screws Flats Bosses and Pads Dimension Origin Symbol Rectangular Coordinate Dimensioning Without Dimension Lines Rectangular Coordinate Dimensioning in Tabular Form Unit 19 Oblique Surfaces Unit 20 Primary Auxiliary Views Unit 21 Secondary Auxiliary Views Unit 22 Development Drawings Joints, Seams, and Edges Sheet Metal Sizes Stampings Unit 23 Arrangement of Views Unit 24 Piping Piping Drawings Pipe Drawing Symbols Unit 25 Bearings Unit 26 Manufacturing Materials Cast Iron Steel Plastics Rubber Unit 27 Casting Processes Casting Design Cored Castings Machining Lugs Surface Coatings Unit 28 Chain Dimensioning Base Line (Datum) Dimensioning Unit 29 Alignment of Parts and Holes Partial Views Naming of Views for Spark Adjuster Drill Sizes Unit 30 Broken-Out and Partial Sections Webs in Section Ribs in Section Spokes in Section Unit 31 Pin Fasteners Sections Through Shafts, Pins, and Keys Arrangement of Views of Drawing A-85M Unit 32 Drawings for Numerical Control Dimensioning for Numerical Control Dimensioning for Two-Axis Coordinate System Unit 33 Assembly Drawings Bill of Material (Item List) Helical Springs Unit 34 Structural Steel Shapes Phantom Outlines Conical Washers Unit 35 Welding Drawings Welding Symbols Fillet Welds Unit 36 Groove Welds Supplementary Symbols Unit 37 Other Basic Welds Plug and Slot Welds Unit 38 Gears, Spur Gears Unit 39 Bevel Gears Unit 40 Gear Trains Unit 41 Cams Unit 42 Antifriction Bearings Retaining Rings O-Ring Seals Clutches Belt Drives Unit 43 Ratchet Wheels Unit 44 Modern Engineering Tolerancing Geometric Tolerancing Feature Control Frame Form Tolerances Straightness Unit 45 Straightness of a Feature Size Feature of Size Definitions Material Condition Symbols Maximum Material Condition (MMC) Regardless of Feature Size (RFS) Least Material Condition (LMC) Straightness of a Feature of Size Unit 46 Form Tolerances Flatness Circularity Cylindricity Unit 47 Datums and the Three-Plane Concept Datums for Geometric Tolerancing Three-Plane System Uneven Surfaces Datum Feature Symbol Unit 48 Orientation Tolerances Orientation Tolerancing for Flat Surfaces Unit 49 Orientation Tolerancing for Features of Size Internal Cylindrical Features External Cylindrical Features Unit 50 Datum Targets Unit 51 Tolerancing of Features by Position Tolerancing Methods Coordinate Tolerancing Advantages of Coordinate Tolerancing Disadvantages of Coordinate Tolerancing Positional Tolerancing Material Condition Basis Positional Tolerancing for Circular Features Advantages of Positional Tolerancing Unit 52 Selection of Datum Features for Positional Tolerancing Unit 53 Profile Tolerances Profile of a Line Profile of a Surface Unit 54 Runout Tolerances Circular Runout Total Runout Establishing Datums
\ BooknewsThis text prepares students for careers in industry. It is designed to contain more information than normally required for a traditional program, so that instructors can select units for courses for a particular industry. Early chapters cover information essential to all courses. Later chapters offer specialized lessons in interpreting engineering drawings. Includes two-color illustrations, assignments and worksheets, plus 26 tables of machining data. Standard and metric units are used. This sixth edition features expanded units on drawings for numerical control and on manufacturing materials. Jensen has 27 years of teaching experience in mechanical drafting. Annotation c. Book News, Inc., Portland, OR (booknews.com)\ \
